Thursday 31 January 2013

5 Crafty Things to Do with ..... Square Pieces of Paper

This weeks 5 crafty things features a simple square piece of paper. Most of the things shown is origami, but who doesn't love a bit of origami, and you can create such beautiful things with it.

1. Paper Wall Art.

I found this on Pinterest, it's from marthastewart.com. It's similar to the paper snowflakes that everyone's familiar with except the paper is square. I think it's cute and would make some interesting wall art. The tutorial for this wall art is available here: http://www.marthastewart.com/272167/rice-paper-wall-art?czone=crafts/crafting-tools-center/crafting-tools-projects&center=276982&gallery=275000&slide=272167 .


2. Origami Crane

 This is one of the most popular origami models and they're super fast and easy to make. You can find an easy diagram tutorial here: http://www.origami-fun.com/origami-crane.html. There are loads of things you can do with these cranes like this below.


http://1.bp.blogspot.com/-p96wvSgu_fI/T7J9ylhQhQI/AAAAAAAAD9M/j2qMfSGs9Vs/s1600/031.jpg

3. Origami Butterfly

 This is another easy but beautiful origami piece. Simple diagram tutorial can be found here: http://goorigami.com/single-sheet-origami/origami-butterfly/3006
 They can be used in similar ways to the crane and would look lovely displayed in a way like the picture above.


4. Origami Heart

 These are very easy to make and as Valentine's Day is coming up they can be used for a variety of things. They can be attached to handmade cards, used as valentine's decorations, write a letter then fold it into this heart shape, whatever you can think of. An easy to follow tutorial can be found here: http://www.origami-instructions.com/easy-origami-heart.html.


5. Origami Star

Last but not least, a square piece of paper can be used to make an origami star. Mine looks very rough in the picture but that's because I was using slightly thick paper that was not very easy to fold (note to self: next time buy origami paper or something besides card!). There is a tutorial here that's easy to follow and shows how nice they look if you make them with patterned paper: http://www.origami-instructions.com/origami-8-pointed-star.html


Thanks for reading this 5 Crafty Things. Coming next week is ....... I haven't quite thought of anything yet, I'll have to put my thinking cap on and get back to you! If you have any ideas, let me know.

Jen x

Sunday 27 January 2013

Heart Shaped Song Lyrics- A Valentine's Craft


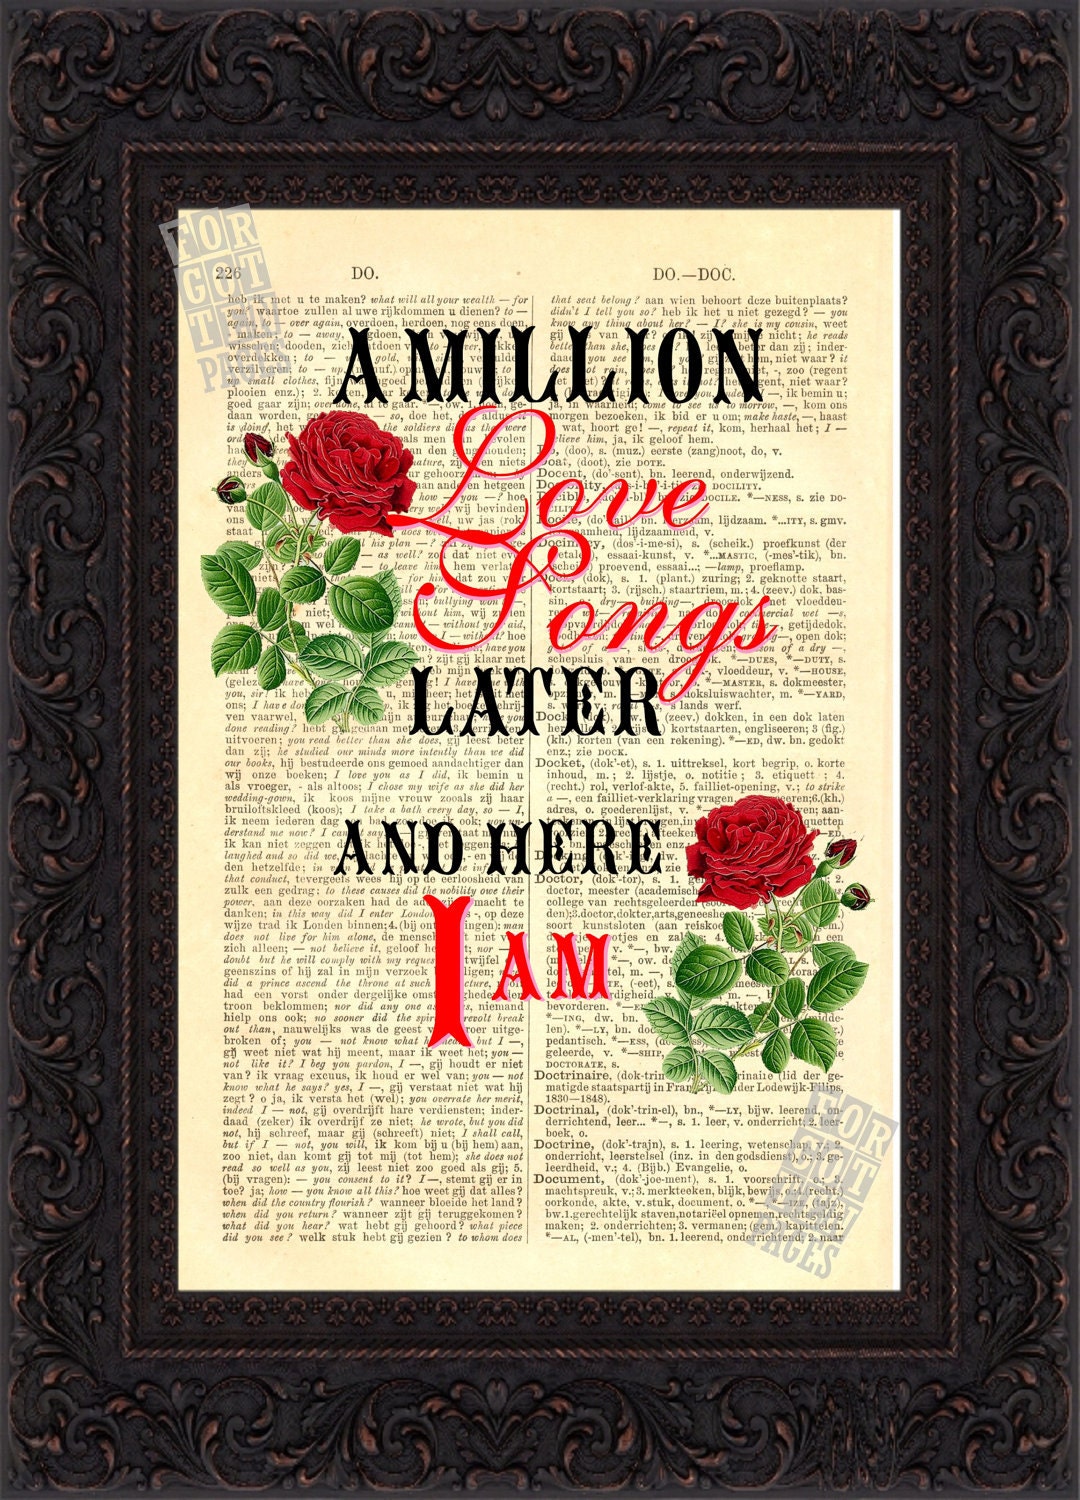
One of my new favourite things to do is put Lovey Dovey song lyrics in the shape of a heart using Microsoft
Word. I saw a picture of it on Pinterest but the link led to a blog that was closed, but after some googling I came across this tutorial on how to do it : http://doitandhow.com/2012/06/19/shape-text-using-microsoft-word/.  I thought it would be the perfect Valentine's craft, so I decided to do it using the lyrics of The Book of Love by Peter Gabriel because I really really like that song. I really think these would make such sweet, personal, unique gifts. You can use lyrics, quotes, poems, words from a love letter!!! Now that would be very romantic!

Here is my tutorial:
 
Step 1: Choose your text and write into Microsoft Word. I spaced each line evenly and highlighted some of my favourite lines in red and made them a little larger than the rest of the words. The font I used was Harlow Solid Italic. I also repeated the lyrics once, simply because some of the words will be cut off when it's put into the heart shape so having the lyrics twice, each line should be readable at least once.


Step 2: Copy and paste this text to Paint. Crop the image so that there is no excess white background as the text needs to go to the very edge of the heart to retain the heart shape.

Step 3: Save the image as a .JPEG or .BMP file. 

Step 4: Back in MS Word, go to Insert and in mine I go to Shapes and there's a heart available, or in the other tutorial you go to Insert, Picture, and choose Autoshape. Once you have your heart, make it whatever size you want.

Step 5: Right click on the heart and choose Format Autoshape. In the Colours and Lines tab, find Fill Effects and click this.

Step 6: In the Fill Effects window, go to Picture and Select Picture. Select the image file that you've just saved and click insert. If it looks ok, click OK. Now you can also have the heart with or without a border. I choose to have mine without the border. To have it without a border, in Colours and Lines, where it says line, click on the colour menu and select 'no colour'.

Step 7: Resize heart if needed, print and enjoy.

Hopefully your heart now looks like mine above. I apologize if my instructions aren't very clear and I'm very sorry I couldn't put up step by step images, I have no idea how to take images from MS Word. The tutorial I've linked is very clear and easy to follow though so if you're having trouble, head over there.

Enjoy!!!
Jen x


Friday 25 January 2013

5 Crafty Things to Do with..... Crochet Roses

Hello, todays five crafty things is things to do with crocheted roses. It doesn't have to be specifically roses or crocheted, any flower or craft would do - knitted, crocheted, felted- whatever takes your fancy. I choose roses because they're so easy to make and only take like five minutes so I've a million of them lying around the place.

1.  Make a ring.
 I made this ring by taking my small crocheted rose and simply attaching it to a blank ring base (I got some on ebay). Very simple, and I think it makes a lovely ring. You could also make the rose smaller or larger, and you can make them in any colour you wish!!


2.    Make a headband.

I made a large white rose, then crocheted a simple band and attached the rose securely to it. And that's a headband with a crochet rose!! I think it would make a cute headband for a baby!


3.   Make a picture with it.

This is a picture I put on Etsy for Valentine's Day (it sold Sunday, yay!!). I was trying to think of something to do with this old frame I had lying around and came up with this, a framed red rose. I stitched the rose, stem, and leaves onto a piece of white fabric, then attached the fabric onto the frame!!
 4. Use them as buttons.
This is a little clutch I have on Etsy at the moment (you can find it here: http://www.etsy.com/listing/121498873/crochet-clutch-in-blue-with-magnetic). I used a magnetic clasp to close it and it looked kinda ugly when it was closed, so I thought I'd use a flower to cover it and make it look like a sort of button. I like it!


5. Use to decorate a pillow/ cushion.

I came across this on Pinterest, I think its gorgeous. I'm definately going to try this. The tutorial for it can be found here: http://nz.lifestyle.yahoo.com/better-homes-gardens/craft/articles/a/-/14613324/how-to-make-a-crochet-flower-pillow/#. The cushion cover in the tutorial is knitted but I think I'll just buy a plain, neutral coloured one and stitch my roses onto that!! Very excited to try it!


And there you have it, five simple, pretty things to do with crochet roses, or any type of flowers.
Coming up next week, five crafty things to do with..... square pieces of paper!!!

Thanks for reading,
Jen x

Thursday 24 January 2013

Wednesday 23 January 2013

A Crochet Clock

Here is my craft project for January all finished, my crochet clock.

 It wasn't the most challenging project ever but I really like it and it's sitting on my mantlepiece.


It was very simple to do. All I did was crochet a circular pattern that I liked, then cut a piece of card the same size to attach the crochet onto.

 I covered the card in some craft paper that I had just to give it a nicer background and simply glued my crochet into it.

Then I made a hole for the clock to go through in the centre and attached the clock piece.

I painted the clock pieces black too because the gold wasn't really matching. The black's not great either but it's better.


And there you have it, a very easy clock project. Now off to Pinterest to find inspiration for a February project.

Jen x